|
Interlinings
Interlining is a layer of fabric inserted between the face and the lining of a garment, drapery, or quilt. It is similar to batting, a thick layer of fibre designed to provide insulation, loft, and body to quilts, pillow toppers, and heavy winter jackets. Depending on the application, the materials in this layer can be woven, knitted, or created by fusing fibres together. Silk, wool, and artificial fibres with good insulating qualities are common choices for interlining. |
|
| Generally, interlinings are soft, thick, and flexible. Some are designed to be fused, while others are intended to be sewn to one or both layers of the textile. As an inner lining within textiles, it is used in a number of applications. Though the consumer never sees it, it is the difference between a good winter coat and a great one, or lush full drapes and listless hanging fabrics. |
| |
In many cases, interlining serves as an additional layer of insulation. For example, drapes are often interlined with flannel or a similarly thick material to keep rooms warmer in winter and cooler in summer, while many winter coats and pants use a thick layer to protect the wearer from the elements. Some of these garments also feature removable interlinings, so that they can be worn in warmer weather as well.
Interlining can also be used to protect fabrics, especially those used in drapes and consequently often exposed to direct light. Delicate fabrics like silk and velvet can suffer from sun damage if hung with a liner alone, and most drapers recommend the use of an interlining for the life of the fabric. In addition to protecting the fabric, it also gives drapes a better form and fuller body. In quilting, the layer can offer an extra bit of fluffiness, along with warmth in the winter.
Garments with interlining tend to be stronger, because of the added layer of fabric support. In addition, they drape better, while keeping the wearer's temperature relatively stable. Interlining generally bespeaks a higher level of quality in a garment, because of the additional manufacturing time involved.
|
| Fusible interlining classification |
| |
 |
According to the different classifications of fabric:
1. Woven Fusible Interlining: used in clothing shoulder, chest, predecessor of waist
2. Knitted Fusible Interlining: for all kinds of knitted garments and fabric with high elasticity of clothing
3. Nonwoven Fusible Interlining: is a non-woven fusible interlining , is fusible interlining cloth. |
|
According to the different classification of thermal sol:
1. Polyamide ( PA ) Fusible Interlining -- wide application, and can be used for light organo-silicon finishing of fabrics.
2. Polyethylene ( PE ) Fusible Interlining -- the regular high temperature washing and dry cleaning clothing and little shirt collar.
3. Polyester ( PES ) Fusible Interlining -- for washing clothing
4. Ethylene vinyl acetate ( EVA ) Fusible Interlining-- used for rainproof clothes |
| |
| According to the classification of hot melt coating:
1. Hot -Melt Transfer Fusible Interlining
2. Micro Powder Fusible dusted interlining Interlining
3. Powder-Dot Fusible interlining
4. Paste-Point Fusible Interlining.
5. Screen-Film Compound Fusible Interlining.
6. Double-Dot Fusible Interlining. |
|
|
What is interfacing?
|
Interfacing is an additional layer applied to the inside of garments, in certain areas only, to add firmness, shape, structure, and support to areas such as collars, cuffs, waistbands and pockets; and to stabilise areas such as shoulder seams or necklines, which might otherwise hang limply.
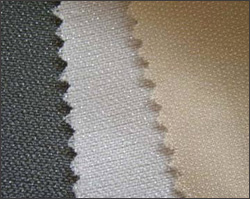
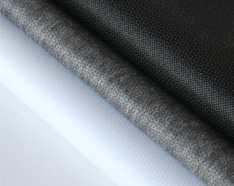
Interfacings come in two main types (fusible or sew-in), three main weaves (non-woven, woven and knit), and in different weights (light, medium, heavy weight). It is important to choose the correct type of interfacing for your garment; if you are using a pattern, they will normally indicate if interfacing is required and what type you need.
When you buy interfacing, you need to decide:
- should you buy sew-in or fusible interfacing?
- do you need woven, non-woven or knit interfacing?
- what weight of interfacing should you buy (light weight, medium weight, heavy weight)?
- which colour interfacing is most appropriate?
|
| |
Sew-in or fusible interfacing
|
Fusible interfacing is by far the easiest to use, especially for beginners. It has an adhesive on one side which bonds permanently with the fabric when applied with an iron, due to the combination of heat and steam. Fusible interfacing is suitable for most uses, but avoid it for:
- very textured fabrics - the glue won't bond well to the fabric
- napped fabrics (e.g. velvet / fur) - the pressing needed to bond the adhesive will crush the fabric
- fabrics that are very heat sensitive - e.g. sequins, metallics, vinyl fabrics (the heat can melt or distort the fabric)
- fabrics with a very loose or open weave e.g. lace, mesh (the glue may seap through to the right side of the fabric)
|
For these types of fabrics, sew-in interfacing is more suitable. Sew-in interfacing is sewn on to the main fabric just like another normal layer of fabric, and is held in place by the stitches. Sew-in interfacing can also result in a more natural shaping and drape as there is less “stiffness” to it.
Whether to use sew-in or fusible interfacing can make subtle changes to the drape of a garment. For most beginner sewing projects, you will be absolutely fine with fusible interfacing; in fact I don’t really recommend using sew-in interfacing until you are really comfortable handling multiple layers of fabric on the sewing machine. Badly sewn in interfacing can really affect the shaping of the garment and give it a poor finish, so unless you’re feeling super confident, and / or your sewing pattern or fabric demands otherwise, stick to the fusible interfacing. |
| |
| Non-woven, woven or knit interfacing |
| |
 |
Non-woven interfacing is made by bonding fibres together and therefore has no grain. You can cut it in any direction, plus it will not ravel, so it is particularly easy to use, and is suitable for most uses (except stretch fabrics – see knit interfacing)..
Woven interfacing, like woven fabric, has a lengthwise and crosswise grain. When you cut woven interfacing, be sure to match the grain of the interfacing with the grain of the part of the garment to be interfaced, to make sure the two layers of fabric work together properly. Because of the need to match the grainline, it is less economical than non-woven interfacing, which can be cut in any direction. |
|
| Knit interfacing is made by knitting the fibres together, and so it has an amount of stretch in it. Knit interfacing is especially suitable for use with jerseys and other stretch fabrics as it will stretch with the garment and not hinder it (if you apply woven interfacing to a knit fabric, you reduce the fabric’s stretch properties as the interfacing layer is unable to stretch with the outer fabric layer). |
| The decision as to whether to buy woven, non-woven or knit interfacing is usually dictated by the pattern and / or type of fabric you are using. As a general rule, non-woven interfacing is suitable for most tasks unless you are sewing with a jersey of stretch fabric in which case knit interfacing is appropriate. You only really need to consider woven interfacing for particularly fine fabrics such as sheers and silks, where a very natural shaping is essential to preserve the qualities of the fabric. |
| |
| Choosing the weight of the interfacing |
| |
 |
The weight of the interfacing should generally be the same as the fabric, or a bit lighter. Generally you should NOT use a heavier weight interfacing than the fabric, as the interfacing will ‘dominate’ the garment and add an unnatural structure to it. So for medium weight fabrics, use medium weight interfacing. For medium weight knit fabrics, use medium weight knit interfacing. As a general rule, if you try and match the properties of the fabric to the properties of the interfacing, you can’t go far wrong – for very sheer or lightweight fabrics, you can even use a second layer of the main fabric as a form of sew-in interfacing!
|
|
| |
| Choosing the weight of the interfacing |
| |
Interfacings generally only come in a dark shade (black / charcoal) or a light shade (white / cream). Simply match up the darkness of the interfacing with the shade of the fabric.
*TOP TIP - Even though it is applied to the inside of a garment, do not use dark interfacing on light fabrics as the dark may show through (and vice versa), especially if the main fabric is loosely woven. The effect is a bit like wearing a white bra with a black top!! |
| |
| How to apply fusible interfacing |
| |
 |
*TOP TIP – before you apply interfacing to your main fabric, it is worth doing a test using a scrap piece of fabric and interfacing. This will let you check that the weight of the interfacing is suitable and that it results in the right amount of shaping to the garment. If you find the end result is too “stiff”, you should try a lighter weight interfacing; if the result is too flimsy, try a heavier weight.
The first step is to identify which side of the interfacing has the adhesive on it. The adhesive side normally has a slightly bobbly, raised appearance, and usually you can see a slight shininess from the glue.
|
|
| Then cut the necessary pattern pieces from the interfacing. If you are using woven interfacing, remember to match up the grain of the interfacing with the grain of the fabric; but you don’t need to worry about this is if you are using non-woven interfacing. For knit interfacing, match up crosswise stretch with crosswise stretch.
Then take your main fabric pieces and interfacing pieces to the ironing board. Place the main fabric wrong side up on the ironing board; and then place the fusible interfacing on top, with the adhesive side facing down on to the wrong side of the main fabric. |
Cover the fabric and interfacing with a damp press cloth, and press the iron on to the fabric. Hold in the same position for about 15 seconds at a time (10 seconds for light weight fabrics), before lifting the iron, moving it to the next position, and repeating. The combination of heat and steam from the damp cloth will permanently bond the interfacing to the fabric. Do NOT “glide” with the iron as you may shift the two layers of fabric and interfacing so they no longer match up.
Once finished, try and lift a small corner of the interfacing to check it has adhered properly. If not, repeat the pressing exercise. If the interfacing has bonded well to the fabric, allow to cool and dry before moving – the interfacing may be reshaped or distorted if you move it while it’s still warm.
*TOP TIP- When choosing the heat setting, it’s usually appropriate to use the “wool” setting for medium or heavy weight fabrics. For light weight fabrics, use a heat setting slightly higher than that which you would use directly on the fabric (as you have the press cloth as a protecting layer in between). When you do your test piece at the beginning, it’s a good time to check the temperature setting is appropriate – too hot and you’ll damage your fabric, too cool and the adhesive won’t bond to the fabric properly.
*TOP TIP - NEVER skip using the press cloth when applying fusible interfacing! Not only does it protect your fabric from excessive heat but it also helps prevent getting any of the adhesive glue on to your iron plate! You may also wish to place a layer of scrap fabric underneath the main fabric, in between the fabric and the ironing board, to prevent any leaks on to your ironing board cover. |
| |
| |
| |
| |
|